
AuthorDaniel Cartland
LinkedIn
Key SEO Considerations for Magento 2
Magento 2 remains one of the most popular CMS platforms for ecommerce sites, used by thousands of businesses, including a large number of clients we work with .
In this guide we’ll talk through how to enable various settings that are important for SEO, and the considerations to think about to ensure that your Magento 2 site is optimised for organic search.
Information Architecture
Subfolder flexibility
Magento 2 allows customisable subfolders, which means that there are no forced /category/ or /collection/ URLs.
Whilst more flexibility is often a good thing, it can lead to SEO issues if not maintained carefully., Over time multiple subfolders can be added that can cause duplicate content issues, either due to marketing departments adding new subfolders for their own purposes, or difficulty in tracking the extent of large Magento shops. Common examples of these include:
- /new-in-shoes/
- /best-sellers-shoes/
- /black-friday-shoes/
Product variants
In Magento products can be shown in your store as either simple or configurable products.
- Simple
- Configurable
Simple products
All physical products added to Magento 2 are simple products, that contain their own SKU value and permalink. This can be beneficial for Google Shopping as it allows every product to be entered individually to appear in the platform.
When shown in your store as simple products every product will exist individually, for example:
- Blue slimsuit mens shirt
- Red slimfit mens shirt
- Yellow slimfit mens shirt
Configurable products
Many different simple products can live under a configurable product, which gives options to choose the type of product you want without altering the URL.
For example, a configurable product may be “Men’s Slimfit Shirts” that sits on one URL with the option for a custom to choose:
- Blue
- Red
- Yellow
In the backend of the site these exist as the simple products below, however, on your site there is only one URL.
- Men’s Blue Slimfit Shirt
- Men’s Red Slimfit Shirt
- Men’s Yellow Slimfit Shirt
Configurable products are particularly useful for some options for certain product elements such as sizing.
A guide on how to create configurable products can be found on our blog.
Simple vs Configurable Products for SEO
Whether to use simple of configurable products depends on the size of your ecommerce store. its authority, and organic reach.
Simple products allow more specific keywords to be targeted (for example the keyword “mens blue slimfit shirts” can be directly targeted by this one specific product page). However, they also will create a large number of URLs on your site which can be detrimental if it means search engines cannot crawl the site as efficiently.
To determine whether to use simple of configurable products on your ecommerce site, the following questions should be considered:
- How many products do you sell?
- How much authority does your site have?
- Are there certain product areas that would benefit from more specific targeting?
A simple (or configurable) rule of thumb
Every site will be different, however, a rule of thumb is that small sites that will find it difficult to rank for more competitive category keywords such as “mens slimfit shirts” should consider having simple products as this will allow them to rank for less competitive longer tail keywords.
Larger sites, who may be more likely to rank for competitive category keywords should use configurable products, as this will give categories more authority and reduce the crawling of multiple similar product pages which may impact crawl budget.
This decision should be taken on a category by category basis and should always be decided with SEO input.
Basic Optimisation
Page title and meta description limits
Meta data can be changed and optimised out-of-the-box on Magento 2. For products, categories, and CMS pages, they can be altered via the Search Engine Optimisation options:
Catalog > (Categories or Products) > Select page of choice > Edit > Search Engine Optimsation.
Page titles should be limited to ~70 characters (the actual limit is based on pixel width) to ensure they are not cut off in the SERPs.
The meta description box allows up to 250 characters to be entered, however, for SEO purposes should be limited to ~160 (the actual limit is based on pixel width).
There are apps available that can create meta templates for particular page types across the site – one such example is Amasty. This can save huge amounts of time on large ecommerce sites with thousands of products.
Internal Linking
Page Duplication
By default Magento 2 creates 2 pages for a product:
- /category/product/
- /product
If left unresolved this can cause issues for SEO, since there can exist 2 (or more) URLs for any given product depending on which categories they sit in.
However, category path URLs can be disabled under the following settings;
Stores > Settings > Configuration > Catalog > Search Engine Optimisation > Use Categories Path for Product URLs > No
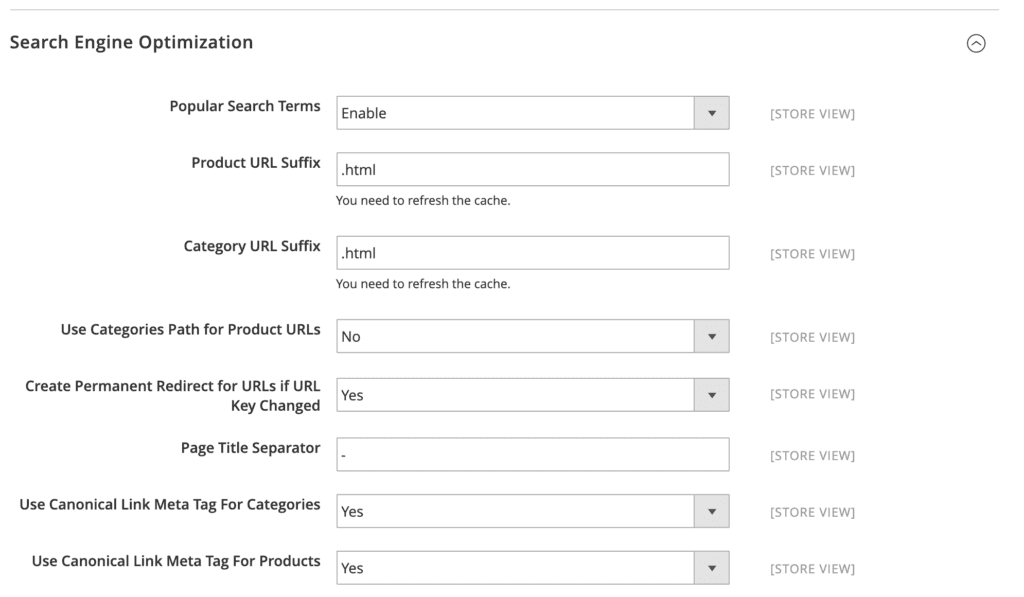
Alternatively, if you want to keep subfolders, canonicals can be implemented on product URLs (Use Canonical Link Meta Tag for Products). This by default adds a canonical pointing to the flat product URL without categories which tells search engines this is the one true URL to rank. However, with this setup it’s important to be aware that this may not be optimum for internal linking and can also create multiple URLs for a single product which may bloat the site in terms of crawl budget on large ecommerce sites.
For general site clean up and management it’s also recommended to use clean product URLs, as this can prevent confusion when one product sits in several different categories on your site.
Breadcrumbs
Since breadcrumbs can give valuable information to search engines about the structure and hierarchy of a site, in addition to promoting consistent internal linking, they can be a powerful tool in any ecommerce website’s arsenal.
Breadcrumbs are enabled automatically in Magento 2, however, for CMS pages they can be disabed in the backend via: System > Configuration > General > Web > Default Pages > Show Breadcrumbs for CMS Pages
To disable breadcrumbs on category or product pages you need to add specific code using the method described. However, since breadcrumbs can be hugely beneficial to SEO – we don’t recommend doing this.
However, this default setting in Magento 2 can give conflicting signals to search engines, as internal links can change depending upon the path a crawler takes. Furthermore, by default Magento will not show subcategories in breadcrumbs.
Therefore, for optimum SEO benefit of breadcrumbs, it may be valuable to use an extension which allows you to include subfolders and choose the pages that are included such as:
- Mageworx Breadcrumbs
Filters, Facets, and Indexing
Filters can be enabled in Magento 2 using the following method:
https://docs.magento.com/m2/ee/user_guide/catalog/navigation-layered-filterable-attributes.html
This creates specific filters on category pages to help narrow down products. The URLs created are parameters based upon the attribute code given to the filter when added in the backend of Magento 2:


Filters and crawl budget
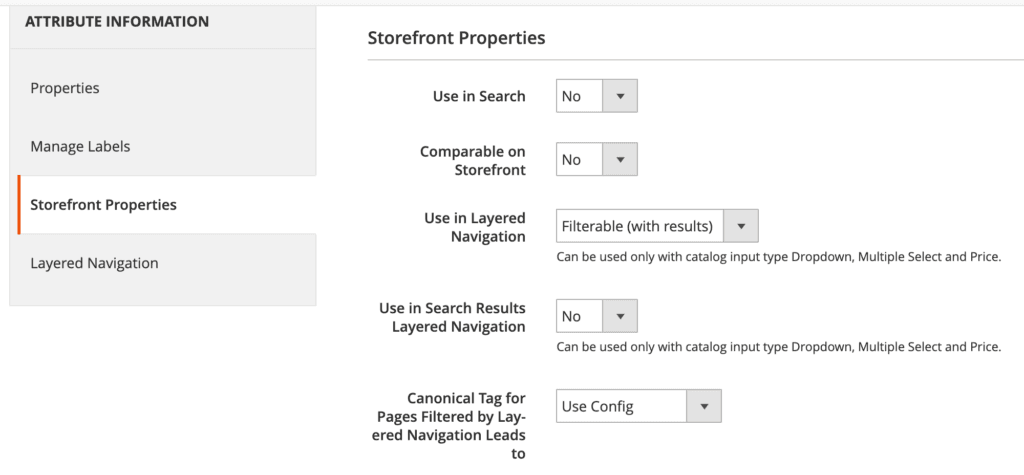
One of the most common problems encountered by ecommerce sites is having all filters indexable, leading to thousands of pages created, with many duplicates. To control which filter pages can be crawled by search engines, you can either block the parameters created in robots.txt or apply a canonical using the Storefront Properties of each attribute.
Indexing filters
Although Magento out of the box allows filters to be indexed, it does not allow page titles, headings or descriptions to be changed based on the filters selected. This means that any filters that are indexed will not be optimised and may be seen as duplicated to the parent category. The parameterised URLs used by default for filters are also not clean or user-friendly in the SERPs.
Fore more control over which filters are indexed and to optimise the page URLs, titles, headings and copy extensions are available:
- Mageworx
This allows you to optimise filter pages as their own categories, which can be beneficial to targeting more specific keywords on your ecommerce site.
Crawling & indexing
Robots.txt control
Magento 2 allows fully customisable robots.txt files, in order to help control which pages search engine bots crawl. For large sites this can significantly help to control crawl budget.
How to edit robots.txt in Magento 2
Content > Design > Configuration > Edit top global store > Search engine robots
Although simple to edit, Magento 2 has been criticised for it’s rather unintuitive structure. Few would describe robots.txt control as being part of the design of a website.


If you have multiple stores (for example in an international site) make sure you change the robots file from the global site as this sits on the root and is the robots file crawlers will reference before crawling your site.
Sitewide changes
Changing the “Default Robots” option will change the robots settings for the entire site – this has 4 options:
- Index, follow – all pages are set to appear in search engines results and crawled (unless the specific path is blocked)
- Index, nofollow – all pages are set to appear in search engines results but not crawled
- Noindex, follow – no pages are set to appear in search engine results, but can be crawled
- Noindex, nofollow – no pages are set to appear in search engine results, or be crawled
NOTE – As of 1st September 2019 Google no longer supports robots.txt noindex directives, and also does not support robots.txt nofollow directives.. Noindex & nofollow directives should be included in the <head> HTML of pages (how to do so is discussed in the “Noindex, nofollow controls” section). Therefore this makes changing the settings above in Magento 2 redundant.
Path specific changes
Path specific changes can be edited from the “Edit custom instruction of robots.txt file” editor box.
By default Magento 2 blocks the following paths:
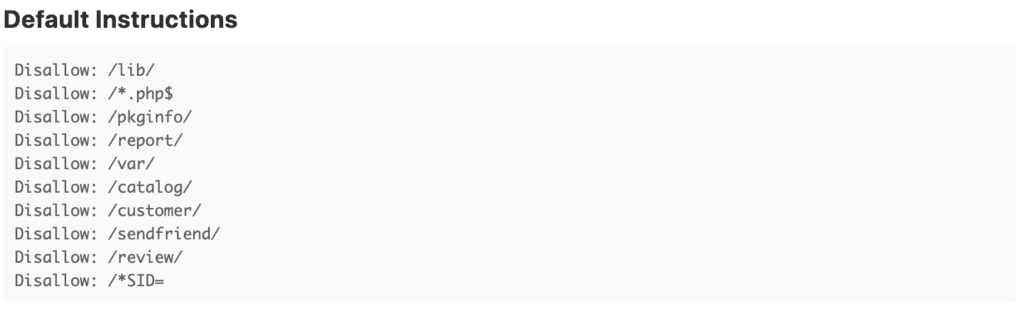
However, with great power comes great responsibility; care should always be taken when editing robots files to ensure they do not block search engines from crawling unintended paths (or entire websites!).
Testing your robots.txt file
Before updating your robots.txt we recommend testing to see which URLs it will block using Google’s Robots.txt tester in Search Console.
If you’re making big changes, it may be useful to take things a step further and imitate a crawl of the site with your new robots.txt settings. This can be done using a custom robots.txt file in Screaming Frog – you can then see all the pages which you’ll be blocking! (COnfiguration > robots.txt > Custom > Enter your URL and edit the robots file)
Noindex, nofollow controls
As Google does not recognise noindex and nofollow directives via robots.txt, if you want to implement these directives, they must be added via the <head> section of a page’s HTML.
The best way to manage noindex, nofollow controls for specific pages, or groups of pages in Magento 2 is via an extension. For example:
Session IDs
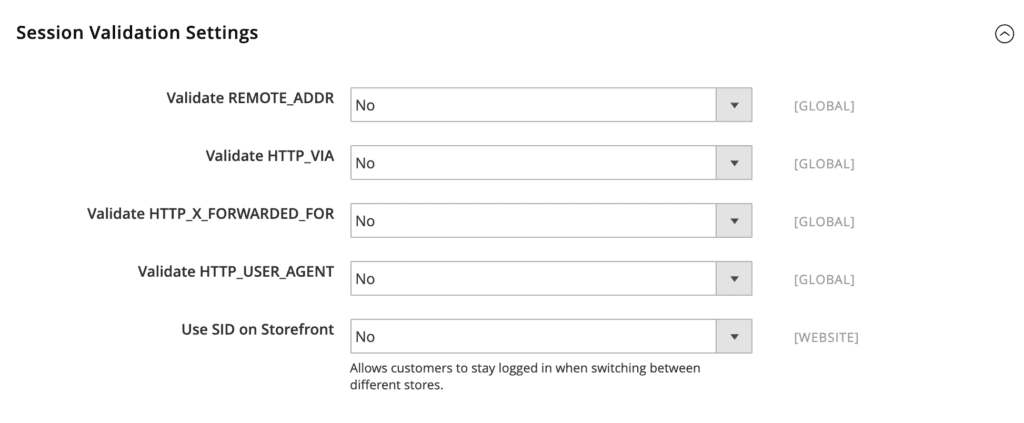
On some Magento sites session IDs (SIDs) are automatically generated onto URLs when someone (or some bot) visits the site. This is normally used to ensure customers stay logged in when switching between stores.
This means that every time Googlebot, or any search engine crawls a site, it will see new URLs with different SID parameters. This can cause a huge amount of duplicate pages, since the same page has a different parameter URL for every page. These duplicate parameter pages can also be indexed if they are not properly handled with canonicals, and can also impact internal linking signals on your site.
SID URLs are also blocked by the default Magento 2 robots.txt, which can cause huge issues as Google will not crawl your site, as the URLs it encounters will contain an SID parameter and thus be blocked.
To remove SIDs Store > Configuration > General > Web > Session Validation Settings > Use SID on Storefront > No
Redirection
Redirects can easily be added to Magento 2 via Marketing > URL Rewrites > SEO & Search > URL Rewrites > Add URL Rewrites
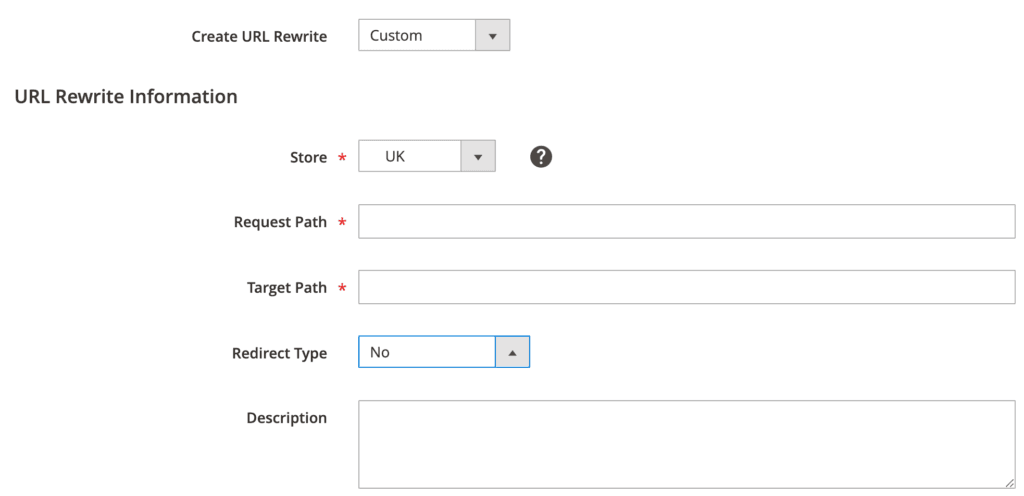
Request path =the URL string you want to be redirected
Target path = the destination URL string for your redirect
These can be custom redirects (ie URL1 to URL2), or the redirection of a whole category, product type, or CMS page (ie /about/) and all their child pages allowing for flexibility to redirect and control redirection with ease.
The redirect type can also be configured depending on why you’re redirecting pages:
- 301 – permanent redirects
- 302 – temporary redirects
Global redirects
Global redirects can only be added server-side; therefore you will likely need a developer to implement any global redirects on the site.
Redirect settings
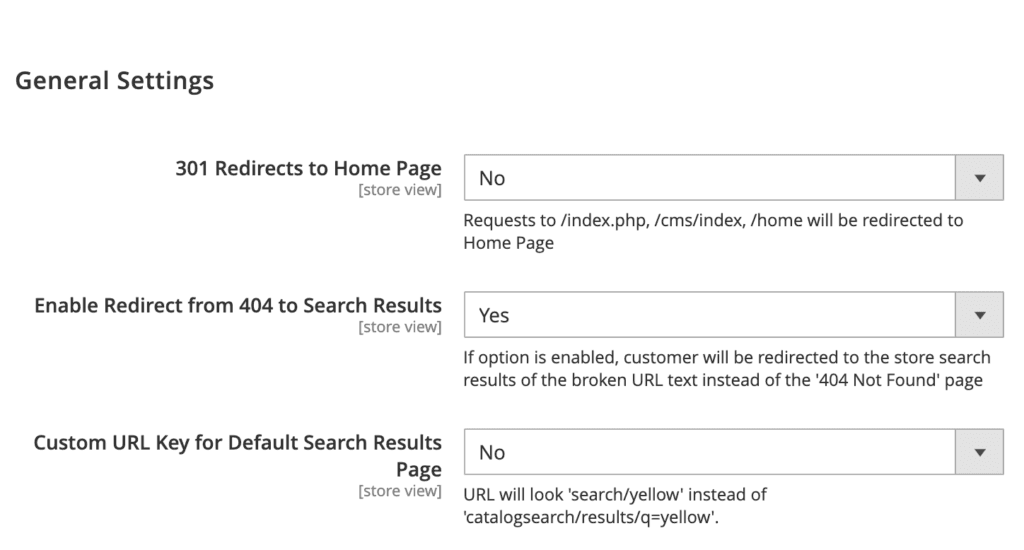
If using Amasty, some additional redirection settings can be set up, including 301 redirects to search pages when a page 404s. However, this can be detrimental to SEO, since it can cause low value search pages to be crawled and indexed if not properly controlled, in addition to making it difficult to spot pages that 404.
These settings can be changed via (Content > Amasty SEO Toolkit > General Settings > Enable Redirect from 404 to Search Results > No).
Sitemap Control
XML sitemaps can be created and sitemap settings (update frequency and priority) configured out of the box in Magento 2. However, if you want to exclude certain URLs from the sitemap, (for example canonicalised or noindex URLs), you will need a third party extension. Extensions will allow the capability to remove out of stock products, specific URLs or categories from the sitemap which isn’t available by default in Magento 2.
You can also generate sitemaps for different storefronts which can be more useful to inform Google about which pages it should crawl on your stores and to gather index information once submitted in Google Search Console.
Sitemaps update automatically at a particular set timeframe that can be set, so if your site has changed significantly you’ll want to re-generate your sitemaps to ensure it doesn’t contain lots of errors.
XML Sitemap Generation
XML sitemaps can be generated in Magento 2 via Marketing > SEO & Search > Site Map – this allows you to create sitemaps with the path and filename that you want them to have.

XML Sitemap Configuration
XML sitemaps can be configured via Stores > Settings > Configuration > Catalog > XML Sitemap. You can set update frequency and priority for category pages, products, and CMS pages.

You can also ensure that the sitemap is referenced in the site’s robots.txt file to make it easy for Google to identify and crawl using the following settings:

Some XML sitemaps extension our clients work with include:
- Amasty SEO toolkit
- Mageworx
HTML sitemaps
HTML sitemaps could be created manually using a CMS page in Magento 2, however, this would be very long winded if you have anything other than the smallest ecommerce site.
Many extensions that offer XML sitemaps also offer HTML sitemaps to help improve the discoverability of pages for search engines and end-users.
Structured Data
Magento 2 does offer Product schema by default, an upgrade from it’s younger brother Magento.
However, to get the most benefit from structured data and have the flexibility to add additional schema markup your best bet is to download an extension that will enable you to add this in Google’s favoured JSON format.
Some extensions used by our clients include:
Page Speed
Page speed is a factor that Google have explicitly announced that they take into consideration when ranking a page – therefore is crucial for SEO. A fast site has also been shown to decrease bounce rates and increase conversion rates, making it a crucial element for any ecommerce site.
Factors that influence site speed when using Magento 2 include:
Enable caching – caching means that static resources do not have to be freshly loaded in every time someone visits a page because they are stored in the cache. Use System > Cache Management to ensure caching is enable.
Minify JavaScript and CSS – this can be done out-of-the-box in Magento 2 via Stores > Configuration > Advanced > Developer.
Check extensions – extensions can be extremely useful to enhance the features offered by Magento 2, however, not all extensions will be optimised perfectly for speed. Ensuring that a particular extension is not significantly slowing your site down is always something to check on sites using Magento 2.
Image compression – Magento 2 compresses images on upload, therefore helping to prevent absolute image size being an issue for speed.Dynamic serving – However, even a compressed image can be far too large if it is being served to a mobile device. You will want to ensure your Magento 2 theme is leveraging dynamic serving; supplying a smaller absolute image file to mobiles and smaller devices.
International SEO
Magento 2 has different configuration options to set up and manage international stores. This is done via 4 tiers of hierarchy Global – Website – Store – Store View:
Global – the Magento instance you are running.
Website – allows websites under different domains to be held under the same Magento 2 installation.
Store – allows you to break up a website into specific stores, for example if you sold different categories of products you could have a shirt store and a shoe store managed separately in Magento 2.
Store View – allows localisation of stores, for example in different languages – crucial for international SEO. You can also provide different currencies for different store views to provide a more tailored experience for users around the world.
Hreflang
An international ecommerce website that does not have their hreflang properly set up can be hugely problematic for SEO, as store views for different locations can compete against one another in the search results (for example a US shirts page vs a UK shirts page). This can not only cause lower rankings, but also result in a poor user experience for customers as they will be taken to the incorrectly localised product page which can cause a higher bounce rate and a lower conversion rate. Hreflang can be implemented via several different methods in Magento 2:
- Hreflang sitemaps
- HTTP header response
- HTML code
Hreflang sitemaps
Hreflang sitemaps can be utilised to provide location and language specific information on Magento 2 sites. This requires the use of a third party extension as the functionality is not built into the default sitemaps.
HTTP header response
The HTTP header response can be used to determine hreflang, however, this requires a developer and is not the most convenient option for most ecommerce sites.
HTML code
Magento 2 out-of-the-box does not contain configurable hreflang tags via HTML, which can be hugely problematic for an international ecommerce store that contains more than one store view, for example multiple locations, or multiple languages.
However, hreflang can be coded in manually if you have a Magento 2 developer, or there are Magento 2 extensions that exist to solve this exact problem. Some hreflang extensions that exist and are used by our clients include:
- Amasty
- Mageworx
Miscellaneous
Security
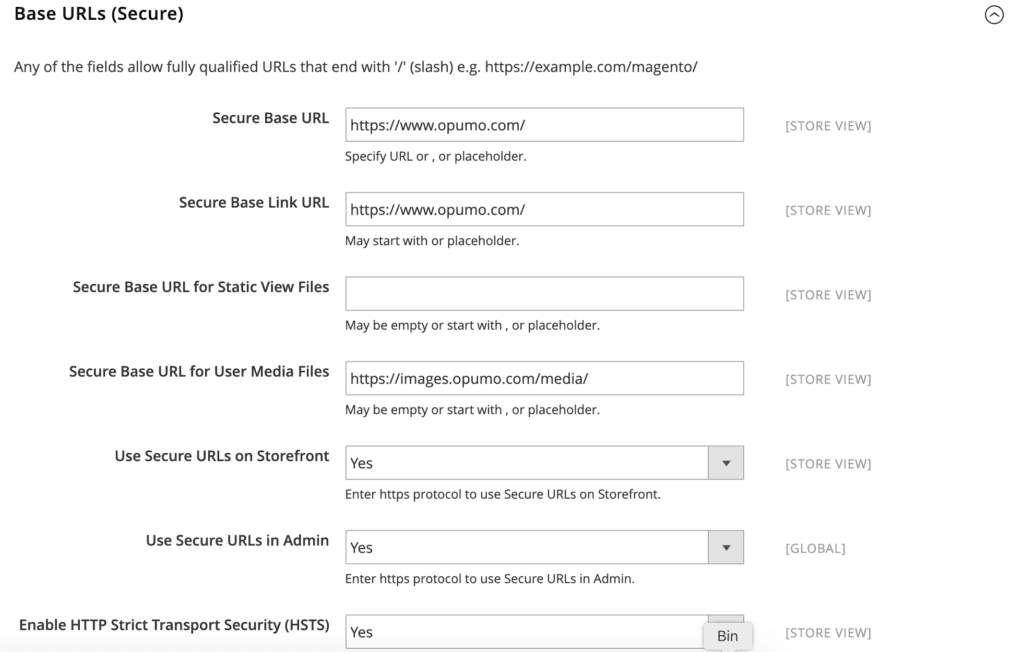
If using Magento 2 you will first have to buy an SSL certificate for your domain, as this does not come by default.
Once you have bought an SSL certificate you can use it on your site via the settings:
Stores > Configuration > General > Web > Base URLs (Secure)

From here you can change the base URL from http to https. You can then use the “Use Secure URLs on Storefront” option to ensure all your customer accessible pages are secure with the “Use Secure URLs on Admin” option to enable the SSL certificate on your admin pages also.
Content Marketing
Magento 2 does not by default have blog functionality. With supporting content crucial to attaining customers at the start of their purchasing journey and throughout, other solutions are necessary.
This can include:
- Using a Magento specific blog extension
- Connecting to WordPress
Whichever option you go for, make sure it has all the functionality you require – WordPress is tried and trusted for thousands of websites so is always a safe bet. If you’re looking to keep things Magento, one of the best blog extensions to use is Magefan.
Does Magento 2 have good SEO?
Magento 2 out of the box is a flexible CMS that allows you to do a range of things that can be beneficial for SEO. It;s flexibility and customisation also makes it a great option for ecommerce websites of any size.
However, with this flexibility comes a level of complexity that can be difficult to manage and master – many options are hidden in seemingly illogical places, or spread across several areas in the backend. Despite the SEO opportunities Magento 2 allows, it also opens up the possibility for big SEO issues if not properly controlled (for example blocking all pages in robots.txt, or the mass duplication of categories), which the restrictions of Shopify prevent. It also means it takes longer to set up.
Because of these reasons, Magento 2 is probably more suited for larger ecommerce sites, however, can be a powerful CMS for any ecommerce site if in the right hands.