

Schema markup is a great way of breaking down difficult datasets found in the body content of web pages into concise, easy to understand information. By marking up a page with schema into structured data elements, you’re offering search engines a far more accessible way of crawling complex information that has the potential to get your website ranking for both rich and featured snippets.
There are a number of ways of implementing schema on a website with advantages and disadvantages to each but if you’re looking for a solution that puts you in the driving seat and allows you to modify and enhance your structured data over time, then look no further. This guide will show you how to add schema markup to your website using Google Tag Manager.
Why use Google Tag Manager for Schema Markup?
Google Tag Manager offers clear advantages for implementing schema markup over other commonly used methods such as plugins or utilising developer skills to implement hard-coded microdata on page.
- Google Tag Manager is often used as a resource for many important tracking features, like implementing Google Analytics, so there’s a good chance you already have this data layer rendered on your pages and this means it does not add additional loading time strain to your overall site speed.
- If errors are reported for your schema markup in Google Search Console, it is easier to fix them in Google Tag Manager because your structured data will be set up dynamically. This means that by fixing an error on a structured data tag in the code, you’ll be fixing it for all of the pages where that specific error is being flagged.
- You will be using a Google product to help search engines understand content on your site better which can help improve rankings. In other words Google will be using Google to help Google render your website more effectively.
This may sound great but there are a few steps that you will need to become more familiar with to help develop schem. Once you have those steps mastered, there’s no limit to the amount of structured data you can add to your website.
For the purpose of this guide, we’ll be showing you how to generate FAQpage schema for your website, follow the steps below and give it a try:
1. Create a tag using JSON-LD markup language
Although these steps are streamlined to avoid using JavaScript where possible, we do need to use JSON-LD markup for creating our structured data tags.
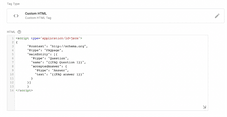
- First, head over to “Tags” on the side navigation and then on the top box select “Custom HTML” from the options Google Tag Manager provides.
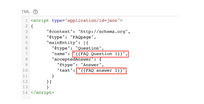
- Next add the following JSON-LD script into the box. This is the framework that we will be firing as a tag on pages we want the FAQ schema to appear. For generating other types of structured data you can use this schema markup generator tool and swap out everything within the first and last { } brackets.

- Select “Advanced Settings” and then change the tag firing option to “Once Per Page”.
- Save your tag and ignore any pop up warning that mentions adding a trigger to your tag, we will be coming back to this stage later on.
2. Define your variable data
Different pages will have differing data, so we need to create variables that reference particular selectors on a page that contain the information we want Google to render.
- Go to “Variables” on the left hand side navigation bar, scroll down to the “User defined variables” section and create a new variable.
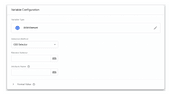
- Next, click on the variable configuration box and select “DOM Element” which is listed underneath “Page Elements”. Here, we will be adding code from the selector we find on the webpage.
- In order to add the selector code from our webpage, first select “CSS Selector” from the selection method dropdown.

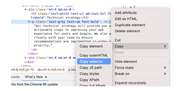
- Now, head over to the webpage you want to extract data from and, using Chrome Developer Tools, right click the container. Select copy > copy selector.

- Finally, add the copied selector code into the “Element Selector” field back under DOM Element in Google Tag Manager and save your variable with a recognisable name.
For any data you wish to extract dynamically from a webpage you will need to set up individual user defined variables that will then be used back in our main tag.
3. Set a trigger for your tag
Creating a trigger for your schema tag will ensure that it is fired on the correct pages. For this particular phase of the build, we will want to establish a common denominator that is exclusive to the pages we are looking to fire our schema tag on.
- On the left side navigation of Google Tag Manager, click on “Triggers” then create a new trigger.
- Next, on your “Trigger Configuration” box, click and select “Page View” as the trigger type.

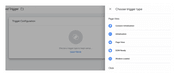
- After this, select the “Some Page Views” option and choose your deciding factor that is applicable to only the pages you want your schema tag to fire on. For example, for FAQ schema, select “Page URL contains/FAQs” if you know that this is the only URL(s) that requires FAQpage schema.
- Finally, save your trigger with a recognisable name.
4. Finalise your schema tag setup
As we approach the final stages of setting up our schema markup using Google Tag Manager, we need to make sure that the tag itself is correctly configured.
- Head back to your previously saved tag from the “Tags” section on the left side navigation.
- Add in your relevant data variables enclosed in double {{ }} brackets to ensure it is recognised as a changing variable type and then save.

- Now, let’s add in our previously saved trigger in the “Firing Triggers” section of our newly created tag and then click save.
5. Test Your Schema Tag in Tag Manager
For the final stages of setting up our schema marking in Tag Manager, we will want to run some testing to make sure it fires correctly on the right pages and with the right information.
- Select “Preview” in the top right corner of the Tag Manager console, which will then proceed to open up a new dialog box where you can input the website domain.
- Once your website has loaded in a new window, navigate over to the page where you have set your schema tag to fire.
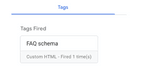
- After this, check back on the tab where Tag Manager is offering a live data feed of your movement around the website. On this tab you should clearly see within the summary that your relevant tag has fired correctly, like the example below:

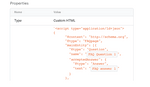
- To check your variable information is correctly configured within your schema tag, click on the tag that has fired where you should now see your custom JSON-LD markup with variable markup active:

- If you’re happy that this has worked successfully, you can now go ahead and publish your new schema markup tag in Google Tag Manager.
6. Final checks using schema validator.
To complete final checks and to make sure that your schema tags are working correctly head over to the Schema Markup Validator and fetch the URL you want to run the test on.
Once there, you will be able to see all of the structured data types that are being rendered for a webpage, including any that have been created using Tag Manager, like the example below:

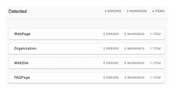
Here, you can check for any errors or warnings that are being flagged and troubleshoot them by going back over the steps set out previously.
Should I use Google Tag Manager for Schema Markup?
The answer really comes down to a small number of critical factors:
- Do you have the budget for a developer to implement schema markup for you?
If yes then great, you can save a lot of time by leaning on their skill set for implementation but remember if errors surface in Google Search Console reports, then you will need to return to them for their expertise and this will involve extra costs. - Are you familiar with JavaScript as a coding language?
If the answer is no, all is not lost. For the most part you can get round this with a few clicks of a button by following the steps above. However, it is advantageous to know JavaScript as you look to elevate your schema markup implementation knowledge and also for troubleshooting purposes.
We have also provided some tips for JSON-LD markup which is needed for generating structured data tags, in step one of this post.
- Is it really worth it for SEO?
Once you have run this exercise for just a handful of different structured data types, you will be well on your way to saving time and money, with the potential of generating more revenue by improving your keyword rankings and snippets on Google Search.
As with most things SEO, it can take time but the results can be really impressive if you follow the best practice guidelines.
Hopefully, this guide has set you up for success implementing schema markup using Google Tag Manager, happy testing!
If you’re looking for more expert advice, check out our SEO blog featuring a host of useful tips and guides for your eCommerce website or get in touch with us today if you’re looking for extra help with your SEO strategy.